In this step, you define the final process steps of the Technical Process. The XML file generated from the CSV file is to be further transformed using an XSL mapping in order to correspond to the desired data structure in the Web App.
For this purpose , you use a so-called mapping or XSL Stylesheet.
Note:
For more complex mappings, knowledge of the elements of XSLT 2.0 may be required. The more complex functions required for this example mapping are included in the step-by-step instructions.
Previous Step: Defining the Technical Process: Buffer
Prerequisites:
You have created the example CSV file that was to be prepared and saved it locally. For more information, see Example: Web App Project .
Creating the mapping
-
Right-click the
ProcessWebApp.wrfTechnical Process in the Projects view and select New > XSL Stylesheet….
The File Creation Wizard dialog opens. -
If necessary, you can customize the name of the stylesheet in the File name field.
-
Click Finish.
✅ The stylesheet is created in the Web App Project and opens automatically in the editor. -
Return to the
ProcessWebApp.wrfTechnical Process.
Inserting the mapping
-
Drag the

Mappingelement from the Palette view next to the
Bufferelement in the editor.
-
Click the element.
-
Enter a name in the Label field in the Properties view, e.g.
Stylesheet. -
Click the
The Choose Transform Input dialog opens. -
Select the previously created XSL file
stylesheet.xsl. -
Click OK.
-
Clear the
Empty Inputcheckbox in the Properties view.
If this option is active, the mapping does not use the data from the previous process step.
-
Select the
Remove X4 Processing Instructionscheckbox in the Properties view.
If this option is active, all X4 Processing Instructions are deleted from the result.
-
Click on the lower right

Bufferelement, hold down the mouse button, and drag a connection to the Stylesheetelement.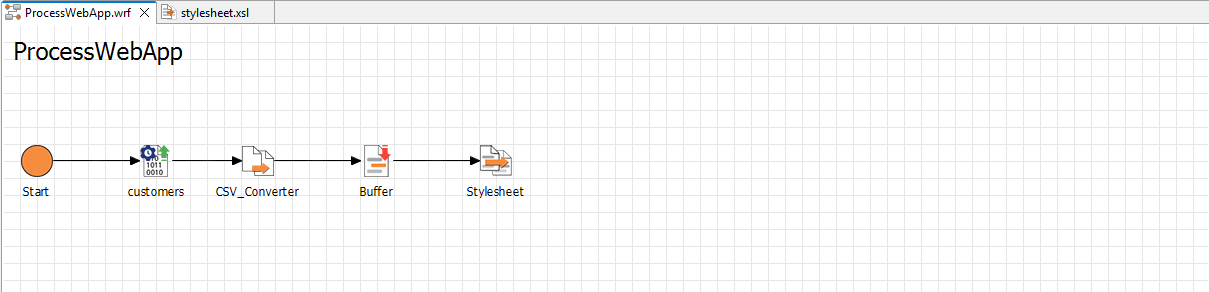
Configuring the mapping
-
Double-click the
Stylesheetelement in theProcessWebApp.wrfTechnical Process .
The linked filestylesheet.xslopens in the editor. -
Drag the temporarily saved
Buffer.xmlfile from the Projects view to the left
stylesheet.xslfile.✅ The XML structure of the file is displayed in the left pane of the
stylesheet.xslfile. -
Right-click the
template match="/"entry in the right pane of thestylesheet.xslfile and select
-
Select
As Childfrom the Location drop-down list and define a name for the element, e.g.Ok. -
Right-click the
Okelement in the right pane and select
-
Select
As Childfrom the Location drop-down list and selectfor-eachfrom the XSL Element drop-down list. -
Click Next.
-
Enter the
Csv/Rowvalue in theselectfield to define the new data structure for each row of the CSV file. -
Click Finish.
✅ A yellow connection line graphically indicates the mapping. -
Right-click the
Okelement in the right pane and select -
Select
As Childfrom the Location drop-down list and define the name of the element:Customer. -
Right-click the
Customerelement in the right pane and select -
Select
As Childfrom the Location drop-down list and define the name of the element:FirstName. -
Right-click the
FirstNameelement in the right pane and select -
Select
As Childfrom the Location drop-down list and selectvalue-offrom the XSL Element drop-down list. -
Click Next.
-
TEnter the
substring-before(//ContactName, ' ')value in theselectfield to set the first name as the first substring from theContactNamefield. -
Click Finish.
✅ A green connection line graphically indicates the mapping. -
Right-click the
Customerelement in the right pane and select -
Select
As Childfrom the Location drop-down list and define the name of the element:LastName. -
Right-click the
LastNameelement in the right pane and select -
Select
As Childfrom the Location drop-down list and selectvalue-offrom the XSL Element drop-down list. -
Click Next.
-
Enter the
substring-after(//ContactName, ' ')value in theselectfield to set the last name as the second substring from theContactNamefield. -
Click Finish.
✅ A green connection line graphically indicates the mapping. -
Right-click the
Customerelement in the right pane and select -
Select
As Childfrom the Location drop-down list and define the name of the element:Company. -
Right-click the
Companyelement in the right pane and select -
Select
As Childfrom the Location drop-down list and selectvalue-offrom the XSL Element drop-down list. -
Click Next.
-
Enter the
//CompanyNamevalue in theselectfield. -
Click Finish.
✅ A green connection line graphically indicates the mapping. -
Right-click the
Customerelement in the right pane and select -
Select
As Childfrom the Location drop-down list and define the name of the element:Address. -
Right-click the
Addresselement in the right pane and select -
Select
As Childfrom the Location drop-down list and selectvalue-offrom the XSL Element drop-down list. -
Click Next.
-
Enter the
concat (//PostalCode, ' ' , //Address)value in theselectfield to concatenate thePostalCodeandAddressfields to one string. -
Click Finish.
✅ Two green connection lines graphically indicate the mapping.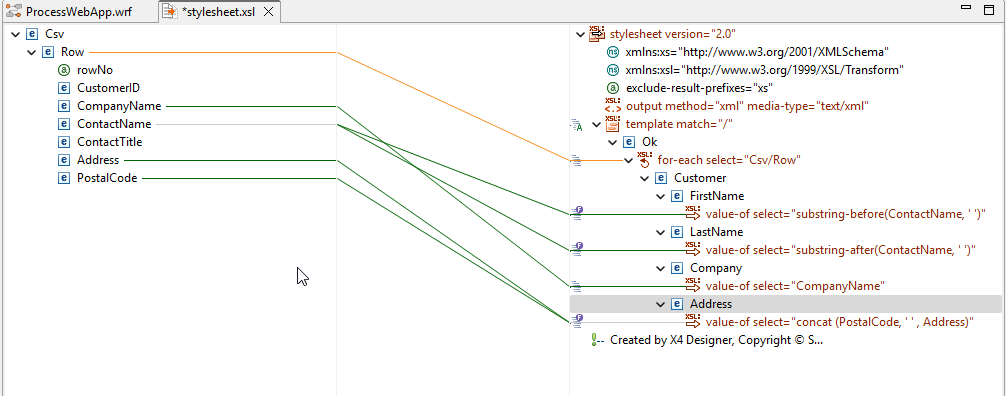
-
Click

-
Return to the
ProcessWebApp.wrfTechnical Process.