Creating a Decision Table and Inserting a Rule
In this step, you add a rule to your process. You define the rules to be applied in a decision table (.rule). For this example, you create a decision table that determines the following:
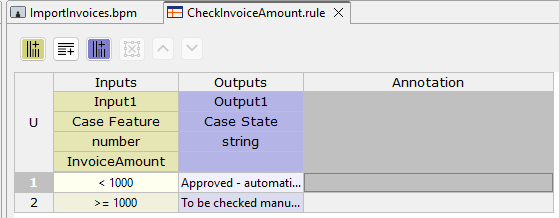
All invoices with an invoice value below 1000 will be automatically confirmed.
All invoices with an invoice value greater than or equal to 1000 will be checked manually.
Previous step: Inserting the First Intermediate Event
Prerequisites:
You have defined business process data. For more information, see Defining Business Process Data.
Creating a decision table
Right-click the BPM Project in the Projects view and select New > Rules….
The File Creation Wizard dialog opens.In the File name text field, enter the name
CheckInvoiceAmount.rulefor your decision table.Click Finish.
✅ The decision table is created in the BPM Project and opens automatically in the editor.Select the
Case Featurevalue as theInputand selectInvoiceAmountin the /Data/Input 1 field.Enter the value
<1000in the Input column of the first row of the table.Click the
 Add After button.
✅ A new table row is added below the current row.Enter the value
>=1000in theInputcolumn of the second row of the table.Select the
Case Statevalue as theOutput.Select the
Approved - automaticallyvalue in theOutputcolumn of the first row of the table.Select the
To be checked manuallyvalue in theOutputcolumn of the second row of the table.Click
Save.
Return to the
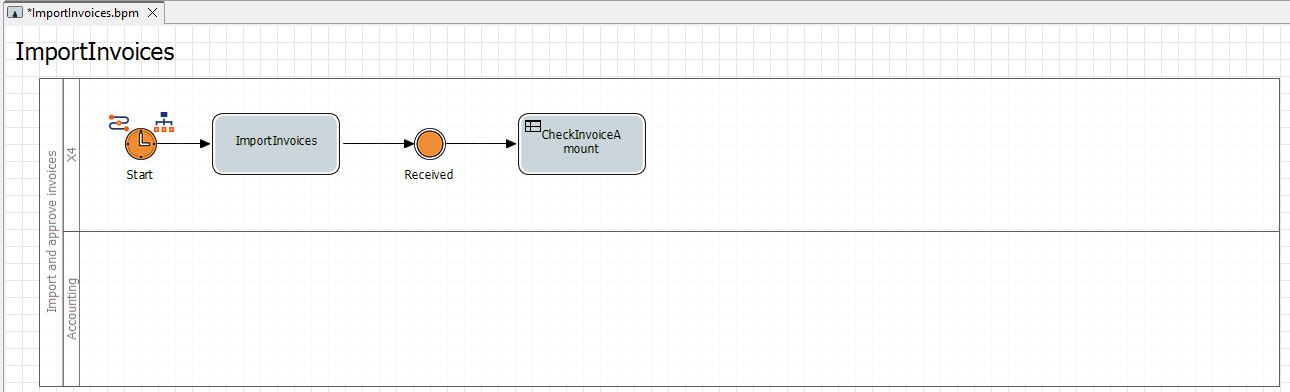
ImportInvoicesBPM Project.
Inserting the rule
Drag the

Ruleelement from the Palette view next to the
Receivedelement in the top lane of the pool.In the Label field in the Properties view, define the name
CheckInvoiceAmountfor theRuleelement.Click the
 button in the Document field in the Properties view.
The Choose Rule Input dialog opens.Select the previously created
CheckInvoiceAmount.ruleRULE file.Click on the lower right
 corner of the
 Receivedelement, hold down the mouse button, and drag a connection to theRuleelement.