Declaring Configurations in the Design View
The individual areas of the Design view are explained below.
Area | Description | |
|---|---|---|
 | Path: Here, you can enter a path that appears as part of the URL in the browser. The first time you open the Note: You can change the path at runtime in the X4 Control Center via Administration > X4 API. | |
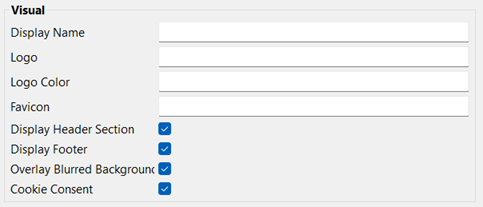 | Display Name: Enter the display name of the Web App in this field. The display name of the Web App is displayed in the browser tab or title bar. Logo: Path to a graphics file (.gif, .png or .svg) or a material icon that is used as the logo of the Web App. Note:
Logo Color: Use this field to define the color of the logo. You can enter a hexadecimal color value (e.g. Using this field, you can only change the color of a logo that you have added via logoURLwith a material icon. You cannot set the color for image files. Note:
Favicon: Path to the graphics file (.gif, .ico, .png, or .svg) used as the favicon of the Web App. The file must be in the Resources folder just below the Web App project. Display Header Section: With this checkbox, you define whether the header section of the Web App is displayed. By default, the checkbox is selected. Display Footer: With this checkbox, you define whether the footer section of the Web App is displayed. By default, the checkbox is selected. Note: If actions are available in the displayed component, the footer is displayed in mobile view independent of the checkbox value. Overlay Blurred Background: With this checkbox, you define whether the background should be blurred or clear when displaying overlay structure elements. By default, the checkbox is selected. This means that the part of the Web App that is still visible in the background when opening an overlay becomes blurry. Cookie Consent: With this checkbox, you define whether the pop-up message for cookie consent is displayed. By default, the checkbox is selected. | |
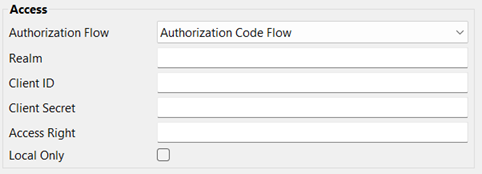 | Authorization Flow: With this drop-down list, you define which authorization flow is used. Available options: Public Access: Resource Owner Password Flow: Note:
Authorization Code Flow: Note: To use the single-sign-on functionality, you need to use the Authorization Code FlowAuthorization Flow. Note: If you have opened Web Apps and have been inactive for a while, the refresh token for your session expires. In this case, the following message is displayed: 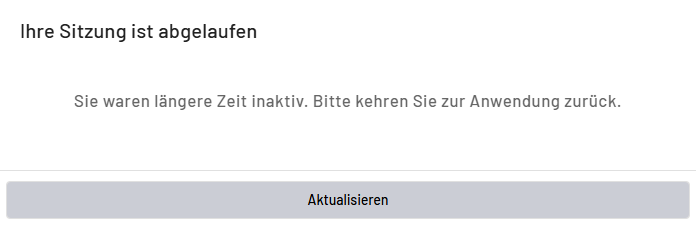 More information: For more information, visit the official Auth0® Inc. website. Realm: Use this field to specify which Keycloak realm is used. Note: The realm value is required if the Authorization Code Flow or Resource Owner Password Flow authorization flow and a realm different from the standard are used. Client ID: Use this field to specify which client from Keycloak is used. Note: The client value is required if the Authorization Code Flow or Resource Owner Password Flow authorization flow and a client different from the standard are used. Client Secret: With this field, you define the Client Secret of the defined client, which can be read from Keycloak. Note: The Client Secret value is required if the Authorization Code Flow or Resource Owner Password Flow authorization flow and a client secret different from the standard are used. Access Right: With this field, you define which role can access the Web App. You can enter the name of a previously defined role. Note: The roles are managed in the Keycloak administration console. Local Only: With this checkbox, you define whether the project is only to be deployed locally. By default, the checkbox is cleared. Note: If this option is enabled, the web application can only be viewed in the browser on the local system. | |
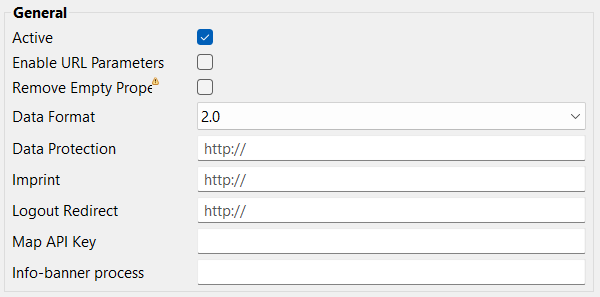 | Active: With this checkbox, you define whether the project is activated. By default, the checkbox is cleared. Note: If the project is not active, the web application cannot be displayed in the browser. Enable URL Parameters: With this checkbox, you define whether data is to be transmitted to a Web App when it is called. Note: You can change this flag at runtime using the Web App Configuration Management adapter. Remove Empty Properties: With this checkbox, you define whether empty property values are sent from the Web App to the X4 process. That is, this option determines whether, for example, uncompleted fields of a form are passed to the process as properties even without values. Available options:
Data Format: With this drop-down list, you define which data format is used. Available options:
Note: This setting cannot be changed during runtime. Data Protection: This field allows you to link external pages as a privacy statement. Imprint: This field allows you to link external pages as imprint. Logout Redirect: This field allows you to redirect users to the specified URL after logging out. You can enter any valid URL with any valid protocol ( MAP API Key: If Google Maps is used as the map provider, the following APIs must be enabled:
Info-banner process: In this field, you can enter the path to the Note: The content of the info banner is automatically reloaded every 30 minutes. To manually reload the info banner content, update the Projects view. | |
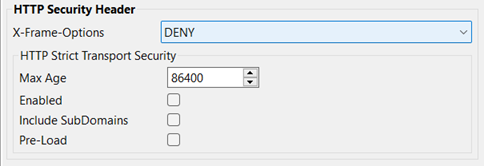 | X-Frame-Options: With this drop-down list, you define whether a browser calling the target page is allowed to embed the page in a Available options:
HTTP Strict Transport Security area : Max Age: In this field, you define the time in seconds the browser is supposed to remember that the Web App can only be accessed via HTTPS. Enabled: With this checkbox, you define whether the HTTP Strict Transport Security response header is enabled or disabled. Include SubDomains: With this checkbox, you define whether the settings for the HTTP Strict Transport Security response header also applies for the subdomains of the Web App. Pre-Load: With this checkbox, you define whether the HTTP Strict Transport Security response header is preloaded. | |
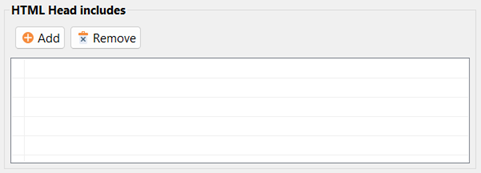 | Here, you can add the path to files in the project. The file contents are inserted into the HTML head as meta elements. Note: The file must be in the Resources directory. |