Creating Entities
Each entity corresponds to an object in your application, such as "Purchase Order" or "Customer". The relationship between two or more entities is represented by mappings. Each entity (object) contains fields (properties) and is provided with a unique technical ID field that is required for links.
How to create a new entity:
- Right-click the Entities folder.
- Select New > Entity.
- In the File Creation Wizard dialog, enter a name for the entity.
- Select Finish.
The next step is to add properties to your entity. To do this, double-click the .entity file in the Projects view to open it in the Entity Editor.
Select Add to add the desired properties, such as name or id:
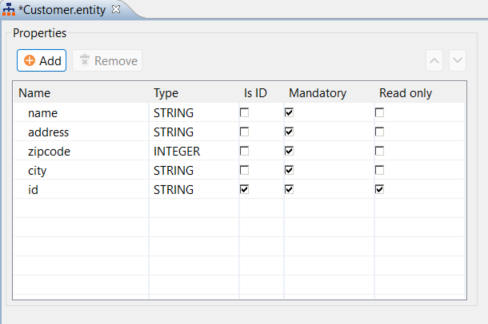
Please make sure that the valid naming conventions for XML elements are adhered to when entering in the Name column. Otherwise, an error message appears in the Problems view and the .entity file cannot be reused.
You can sort the entries by selecting an entry and using the arrow keys in the upper right to move it up or down. This allows you to arrange all entries as desired.
The table in the .entity file contains the following fields:
| Field | Description |
|---|---|
| Name | Here, you enter the desired name for the property. Use the Add button to add a new property. Use the Remove button to remove properties that you no longer need. |
| Type | Use this drop-down list to specify the type of property. Possible values:
|
| Is ID | Use this checkbox to specify whether the property is a defined ID. |
| Mandatory | Use this checkbox to specify whether the property is required or optional. |
| Read only | Use this checkbox to specify whether the property is read-only. |
In addition to the Design view shown above, you can also open the .entity file in the Source view and define the properties in the form of XML elements and their associated attributes.