Creating Entities
Each entity corresponds to an object in your application, e.g. "order" or "customer". The relationship between two or more entities is represented via associations. Each entity (object) contains fields (properties) and is labeled with a unique technical ID field which is needed for associations.
To create a new entity:
- Right-click on the Entities folder.
- Choose New > Entity.
- Enter an entity name in the File Creation Wizard dialog.
- Choose Finish.
In the next step, you can add properties to your entity. To do so, double-click on the .entity file in the Projects view to open it in the Entity Editor.
Choose Add to add the desired properties, e.g. name or id:
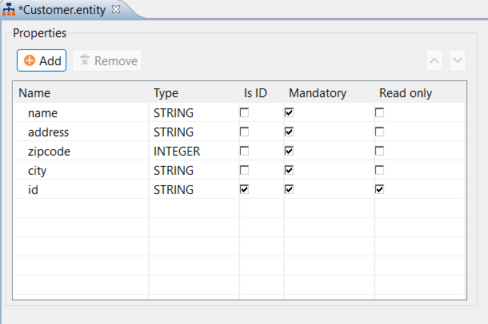
Please observe the applicable naming conventions for XML elements when making entries in the Name column. Otherwise, an error message will be displayed in the Problems view, and the .entity file cannot be used.
The table in the .entity file contains the following fields:
| Field | Description |
|---|---|
| Name | You enter the desired name for your property in this field. Use the Add button to add a new property. Use the Remove button to remove properties you do not need anymore. |
| Type | You use this drop-down to set the type of the property. Possible values:
|
| Is ID | Use this checkbox to define whether the property is a defined ID. |
| Mandatory | Use this checkbox to define whether the property is mandatory or optional. |
| Read only | Use this checkbox to define whether the property is read-only. |
In addition to the Design view shown above you can also open the .entity file in the Source view and define the properties as XML elements and the corresponding attributes.