All-in-One - Interactive Installation
This installation package contains the X4 Designer, X4 Server, Keyloak authentication provider, and preconfigured Web Apps (available in the X4 Control Center) in one package and is provided as an EXE file for installation on Windows. For more information about the three installation components, see X4 BPMS Installation Components .
Note:
On the SoftProject website in the X4 BPMS > Downloads section, you can find a video tutorial that guides you through the installation of the all-in-one installation package in only a few minutes.
How to install the All-in-One - Interactive Installation package:
Download the All-in-One - Interactive Installation package from the X4 BPMS > Downloads section of the the SoftProject website.
Note:
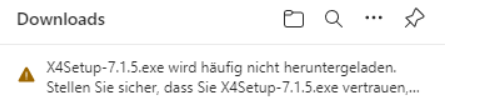
When downloading EXE files using Microsoft Edge, a message such as the following may appear:
Proceed as follows to save and run the file:
1. Move the cursor over the text and select the three points (More actions...), which are displayed to the right.
2. Select Keep.
3. In the dialog window that opens, select Show more , and then Keep anyway.
- Open the EXE file to run it.
The installation routine starts. Select Next to specify the installation path.
Note:
By default, the X4 BPMS is installed under the path C:\X4. However, you can also change the installation path by selecting a different path via Browse… or by entering a new path in the text field.
Use Next to go to the next step where you can select the installation components.
Because you want to install the all-in-one package, which includes all components, you do not usually make any changes here.
Use Next to go to the next step where you can select additional tasks.
In the Select Additional Tasks dialog window, you can specify under Additional Icons whether you want to create a desktop icon for the X4 Server and X4 Designer.
You can also choose whether to install the X4 Server as a service.

Note:
When you first install the X4 BPMS, the "Create desktop icon for X4 Designer" and "Create desktop icon for X4 Server" checkboxes are activated by default. If you have already installed another version of X4 BPMS, the checkboxes are deactivated as shown in the screenshot.
If you are using the X4 BPMS with a trial license, make sure that the Install X4 Server as Service checkbox is deactivated.
Note:
If you activate the Install X4 Server as Service checkbox to install the X4 Server as a service and want to manually stop the X4AuthenticationProvider Keycloak service via the Windows Task Manager, this message may appear: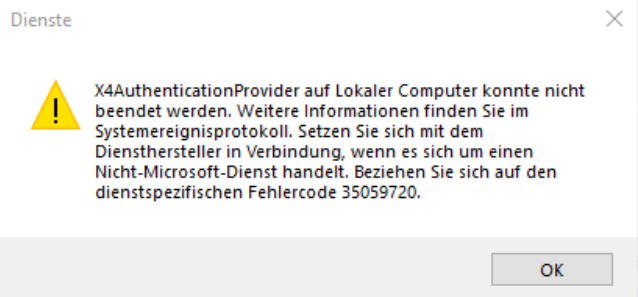
This is a Windows message that you can ignore. The service will still stop and you can close this message by pressing the OK button.
Go to the next step with Next.
In the Ready to Install dialog window, you can review the information you provided in the previous steps.
If you want to make changes, you can use Back to go back to the dialog window where you want to change something.
- Click Install to start the installation routine.
- Select the components you want to start and finish the installation by clicking Finish.
The X4 BPMS is now installed and the components you have selected in the last step are automatically started.
If you have not selected a component, you can also manually start the desired components.