Skip table of contents

Mapping Editor

he Mapping Editor allows to create and edit XSL mappings in a graphical interface. Using XSLT, you can transform an XML data structure into another XML data structure or into an XSL-FO document. The Mapping Editor supports you with a graphical interface and with an automatic stylesheet and XPath validation when creating or editing XSL mappings.

An XSL mapping involves three documents:

  • XML source document (or an XML schema to provide the input structure)

  • XSLT stylesheet (created with the Mapping Editor)

  • Result document (in most cases: XML)

To open the Mapping Editor, create a new mapping or open an already existing XSL mapping.

The Mapping Editor's structure

The Mapping Editor is divided into the following areas:
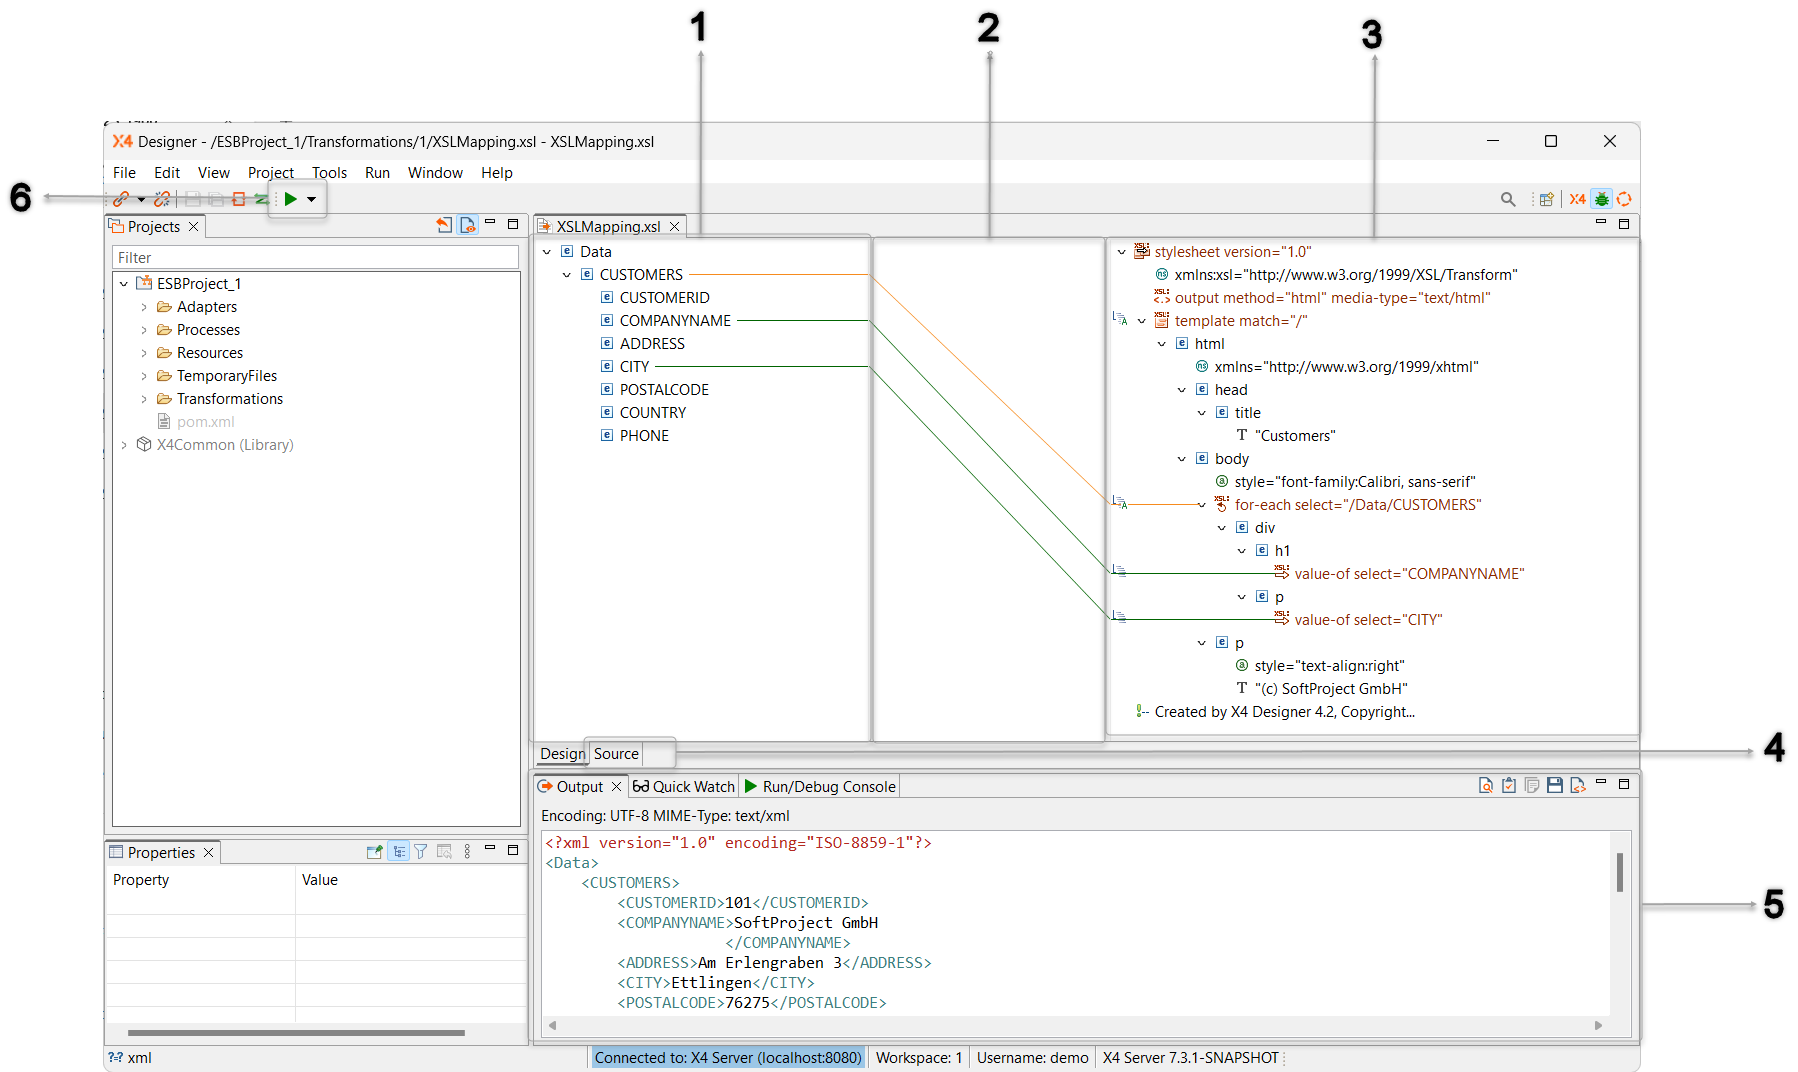
1

Source document pane

The source document to be transformed or an XML Schema file (.xsd) is displayed here.

Using the context menu, you can edit selected nodes as follows:

  • Copy XPath for this element to Clipboard: copy XPath expression of the selected element to the clipboard and use it elsewhere

  • Assign Input: assign input XML document

  • Remove Input: remove assigned input XML document

  • Paste Input: insert XML document from the clipboard

2

Linking pane

The Linking pane displays lines that visualize the relationships between source and stylesheet nodes.

The chapter Shortcuts in the Mapping Editor gives you an overview of the most important key combinations helping you to work with XSL stylesheets.

3

Stylesheet pane

The Stylesheet pane is where you edit the stylesheet. It displays the XSL stylesheet in an editable tree with specialized features for editing XSLT stylesheets. 

The different parts of the stylesheet are displayed with symbols and colored highlighting in the tree view:

  • Nodes that contain XSLT instructions are colored brown and have a corresponding icon, e.g., 

  • If a node contains an XPath expression, it is indicated by the XPath icon 

      on the left side. You can click on this icon to edit the XPath expression.

  • Virtual nodes (incurred nodes from an assigned XML document or XML schema that do not yet explicitly exist in the XSLT stylesheet) are greyed out.

Using the context menu in the stylesheet pane, you can edit selected nodes as follows:

  • Edit XSL Element: Edit selected XSL element

  • Rename: Rename the node

  • Element: Insert an element

  • Attribute: Insert attribute

  • Edit: (In case of processing instructions and namespace declarations) Edit node content

  • XSL Element: Insert XSL element

    • as Child: as child node

    • Before: as node before the selected node

    • After: as node after the selected node

  • Add other nodes: Add other nodes (NamespaceTextCommentProcessing Instruction

  • Add here(In case of virtual nodes) Convert a virtual node into a real node

  • Add Processing InstructionsInsert processing instructions to set Dynamic Parameters.

    • Condition State for status information

    • Log Info for log messages

    • Dynamic Parameter to set dynamic values

    • No Result for empty mapping outputs

  • Add Parameter: Insert system, global or project parameters, see Creating and Using Parameters

  • Add Parent: Insert a parent element (superordinate element)

  • Cut/Copy/Paste: Cut, copy, or paste selection 

  • Delete: Delete the selected node

  • Expand/Collapse: Expand or collapse the child nodes of the selected node

  • Assign Virtual Nodes: Insert virtual nodes from an XML document or schema

  • Remove Virtual Node: Delete virtual nodes from an XML document or schema

The XSL Element Creation Wizard allows to create XSL mappings quickly and easily. The wizard offers the complete range of XSLT 2.0 elements and enables to create them easily via the context menu.

Within the wizard, you can specify whether the new element is to be created before, after or as a child of the selected element. Features like auto-completion, or the display of all available and allowed XSL elements enable faster work.

Moreover, the wizard allows to set and to edit the attributes of the XSL element. Required attributes are set automatically, optional attributes can be selected and filled as needed.  For attributes that have multiple options to choose from, a drop-down list with all available values is provided.

4

Source and Design view

You can switch between two different views within the Mapping Editor:

  • Design : The editor displays the XSLT stylesheet as a tree in a three column view. Here, you can graphically map nodes of the source document/schema to the XSLT stylesheet nodes by drawing connection lines.

  • Source : In this source code view, you can edit the XSLT stylesheet directly in an XML editor

5

Output

The result of locally run XSL mappings is displayed in the Output view.

The following additional actions can be performed via the toolbar:

  •  Save content of output view: Save the data form the output view

  •  Format the content of the output view: Format the data from the output view

6

Run transformation

Via 638eb62c-b82b-4de4-b30c-eda9abdd8043.png Run Transformation, you can run the XSL mapping locally and display the transformation result in the output view (5).

JavaScript errors detected

Please note, these errors can depend on your browser setup.

If this problem persists, please contact our support.